Sous Vide Fried Chicken Recipe
From 'The Complete Sous Vide Cookbook: More Than 175 Recipes with Tips & Techniques
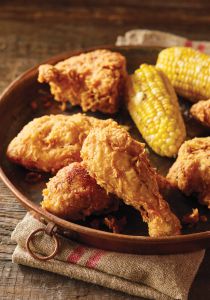
 This is an ideal method for creating fried chicken that’s simultaneously juicy and crisp. Cooking the chicken sous vide yields precisely cooked meat. That way, when you’re frying it, you can focus on achieving a perfectly golden, crispy crust. Coleslaw and corn on the cob are my must-have classic accompaniments for this meal.
Freezer Bag Friendly
Tips
This recipe can be doubled or halved. If you’re doubling it, preheat the oven to 200°F (100°C). As you finish frying the chicken pieces, transfer them to a baking sheet lined with paper towels and place in preheated oven to keep warm. Make sure to fry the breast pieces last, as they can dry out more easily in the oven.
If you prefer, you can make this recipe using all chicken legs or all breasts, for a total of 21⁄2 lbs (1.125 kg) of meat. Refer to the chart on page 141 for cooking times and temperatures for leg or breast meat and add to the hot water bath in Step 3. Omit Step 4.
Your butcher can carry out step 1 for you, if desired.
- Preheat hot water bath to 141°F (60.5°C)
- 2 sous vide pouches
- Large, deep, heavy-bottomed saucepan or Dutch oven
- Candy/deep-fry or infrared thermometer
Ingredients
1 whole chicken (21⁄2 to 3 lbs/ 1.125 to 1.35 kg; see Tips) 1
salt and freshly ground black pepper
3 cups all-purpose flour (see Tips, at right) 750 mL
2 tablespoons garlic powder 30 mL
2 tablespoons onion powder 30 mL
2 tablespoons sweet Hungarian paprika 30 mL
1 tablespoon kosher salt 15 mL
1 teaspoon cayenne pepper 5 mL
1 teaspoon freshly ground black pepper 5 mL
2 cups buttermilk or plain kefir 500 mL
vegetable oil for frying
Directions
Makes 4 servings
- Place chicken on a cutting board. Using a sharp chef’s knife or kitchen shears, cut along both sides of the backbone and remove. Cut off tips and flat sections of the wings, leaving just the first joint attached to the breast. Turn over chicken and cut in half through the breastbone. Cut out breastbone and wishbone. Cut off leg portions, keeping skin intact as much as possible. Cut each breast crosswise into 2 pieces of equal weight, leaving a small, thick piece attached to each wing. Separate thighs from drumsticks at the joint. Save bones and trimmings for stock, if desired.
- Pat chicken pieces dry with paper towels. Season liberally to taste with salt and pepper. Place thighs and drumsticks in one sous vide pouch. Place breast pieces in other sous vide pouch. Spread out pieces so they are not overlapping; seal pouches.
- Refrigerate breast pouch. Immerse thigh-and-drumstick pouch in preheated hot water bath and cook for 1 to 2 hours.
- Lower hot water bath temperature to 138°F (58.9°C) and immediately add breast pouch. Continue to cook for 3 hours more.
- Remove chicken pouches from hot water bath, transfer to an ice bath and chill for 30 minutes. (To make ahead, see Tips, at left.)
- Meanwhile, in a large bowl, whisk together flour, garlic powder, onion powder, paprika, salt, cayenne and black pepper. Pour buttermilk into a medium bowl.
- Open pouches and pat chicken dry with paper towels. One piece at a time, dredge chicken in seasoned flour, shaking off excess. Dip into buttermilk, rolling to coat completely and letting excess drip back into bowl. Dredge chicken again in seasoned flour mixture, turning to coat completely. Place coated chicken on a baking sheet or platter and set aside. When all pieces are completed, refrigerate baking sheet, uncovered, until ready to use, for at least 1 hour and up to 2 hours (this will help keep the chicken from overcooking). Discard any excess flour mixture and buttermilk.
- Pour enough of the oil into heavy, deep saucepan to come 1 inch (2.5 cm) up the side, being sure to leave enough space to more than accommodate the amount of oil that will be displaced when the chicken is added. Heat oil until thermometer reads 370°F (188°C). Starting with legs and drumsticks, add chicken to oil, in batches to prevent crowding, and cook, turning often, for 6 minutes or until golden brown and crisp. As completed, transfer pieces to a plate lined with paper towels. Cover with foil and a folded kitchen towel to keep warm. Serve on warm plates.
More Tips
To make your fried chicken gluten-free, substitute your favorite all-purpose gluten-free flour blend. Alternatively, in Step 6, whisk together 1 cup (250 mL) each cornstarch, white rice flour and water chestnut flour (available in Asian grocery stores), transfer the mixture to a food processor fitted with the metal blade, and process to break down water chestnut flour.
To make ahead: Prepare through Step 5. Refrigerate sealed pouches for up to 6 days or freeze for up to 6 months. To use frozen chicken, thaw overnight in the refrigerator before proceeding with Step 6.
Great care must be exercised when frying in a pot with this amount of oil. If you have a deep-fryer, I suggest that you use it for this recipe. In a pot, a thermometer with a digital timer and a remote probe is handy and adds an element of safety. Set the temperature alert to the temperature specified in the recipe. That way, the alarm will ring when the temperature is reached.


